Quantcast
Channel: P25 – rtl-sdr.com
Viewing all 54 articles
Browse latest View live

RTL-SDR Tutorial: Decoding Digital Voice (P25) with DSD

$
0
0

Update: See out new tutorial for trunked radio tracking, including digital voice trunked tracking.

The RTL-SDR software defined radio combined with SDRSharp, and a program called “digital speech decoder” (DSD) can be used as a radio scanner to easily and cheaply listen to unencrypted digital radio voice conversations.

Digital radio voice communications are becoming more commonly used in the radio spectrum. This is due to the various improvements offered over traditional analogue voice radio systems. Unfortunately for radio scanner hobbyists, digital radio is difficult to receive, as special radio scanners which can be expensive are required to decode the digital signal. Additionally, digital radio systems can be encrypted making it impossible for communications to be decoded by a hobbyist. However, most users of digital radio do not bother to encrypt their systems as it can introduce lag and extra battery drain in portable radios.

The most common digital speech codec is APCO P25, which DSD is able to decode. DSD is also capable of decoding other common digital codecs such as DMR/MOTOTRBO and ProVoice which no hardware scanner is currently capable of.

Super cheap software radios such as the RTL-SDR can be used to decode these digital voice communication signals instead of expensive radio scanners. While this tutorial is aimed at the RTL-SDR, other software radios such as the Funcube dongle, HackRF and BladeRF will also work. Hardware radios with discriminator taps may also work.

Examples of DSD Decoding Digital Voice with RTL-SDR as a Radio Scanner

YouTube user Geoff Wolf shows a video where he uses RTL-SDR as a police scanner to listen to public safety P25 digital radio using DSD, SDRSharp and virtual audio cable.

YouTube Video

YouTube user Superphish uses RTL-SDR as a radio scanner to decode MOTOTRBO digital voice of a taxi company, using DSD, SDRSharp and virtual audio cable.

YouTube Video

Tutorial – Decoding Digital Voice using SDRSharp, DSD and RTL-SDR (For Windows)

It is assumed you have an RTL-SDR dongle set up and working with SDRSharp. If not, see the buy RTL-SDR, and quickstart pages first before attempting this tutorial.

First, you will need to download the lastest DSD 1.6 version and extract the zip file or place the exe into a folder. Download the latest “Windows Port with P25/DMR Filter”.

Update 25 Feb 2014: Note that there is also the still in development DSD 1.7 available which can also decode D-STAR voice. DSD 1.7 needs to be manually compiled first. These links can help you to compile it for Windows and Linux. There is also DSD+ now available which has much improved P25 and DMR decoding, especially for weak signals. DSD+ download and instructions can be found here. With DSD+ the installation of Cygwin shown in this tutorial can be ignored, but pay attention to the steps needed to download lame_enc.dll on the above link.

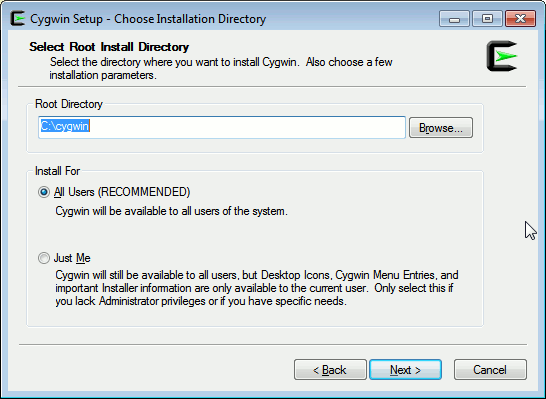
Next, if you don’t have Cygwin installed, you will need to go to www.cygwin.com. Download and install the 32-bit version of Cygwin. Even if you have a 64-bit PC, you should use the 32-bit version of Cygwin as DSD is a 32-bit program. You can use the default install options, but make sure you record what “Root Directory” your Cygwin is being installed to. I just install to “c:\cygwin”.

Set the cygwin root folder

Once installed, navigate to the root directory folder where Cygwin was installed to. Open up the “bin” folder, and find the file “cygwin1.dll”.

Find the cygwin1.dll file

Copy and paste this file into the DSD folder.

DSD Folder

You will also need an audio piping utility such as virtual audio cable. (The trial version of virtual audio cable may work, however a watermark sound is played periodically which could cause a bad decode). You can also use the free VB-Cable as a virtual audio cable alternative.  Also ensure virtual audio cable or VB-cable is set as the default recording audio device in windows sound properties as DSD will use the default sound device.

The sampling rate of your audio piping method must be set to 48000 samples/sec. To set this in Windows, right click your device in the Windows sound recording tab, go to properties and under the advanced tab, set the sample rate to 48000Hz. Do the same to the same device under the Playback tab as well.

Sound Properties

Also, in your SDRSharp folder, open SDRSharp.exe.Config in a text editor such as Notepad, and ensure the key minOutputSampleRate has a value of 48000 such that the line reads as <add key=”minOutputSampleRate” value=”48000″ />.

Set SDRSharp Sample Rate

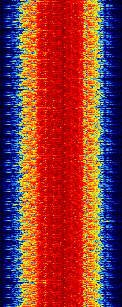
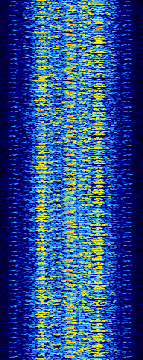
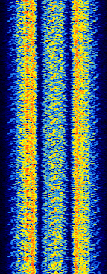
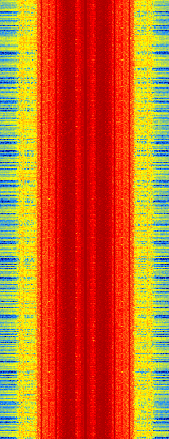
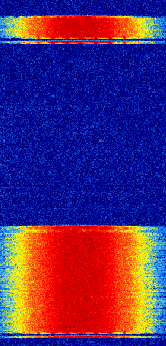
If you are unfamiliar with what a digital voice signal may look like, two waterfall examples are shown below, with audio examples.

P25 (LEFT)

DMR/MOTOTRBO (RIGHT) 

P25 Waterfall ExampleDMR/MOTOTRBO Signal Waterfall


Now to decode the digital voice signals follow these instructions.

  1. Open SDRSharp and set the audio output to virtual audio cable or VB-cable.
  1. Set the receive mode to NFM, with a bandwidth of about 12.5KHz.
  1. Tune to a digital voice signal frequency. You will need to Google for these frequencies by your location. The radioreference databases may be a good place to start looking for these frequencies. Most digital voice frequencies will be around 850 – 900 MHz.
  1. Open a command prompt from Start->All Programs->Accessories->Command Prompt, and navigate to the folder where DSD is located. For those who are not familiar with the command prompt, use the “cd” command to change directories within command prompt. For example, if your DSD folder is located in c:\Radio\DSD, you would type in command prompt “cd c:\Radio\DSD”.
  1. Type in “dir” to show a list of files in the current directory, and look for the name of the DSD .exe file. Now type into the command prompt the file name of the DSD .exe file, which at the time of writing this article is “dsd160″, and then press enter to start decoding.

At this point, text should be scrolling through the command prompt window when a digital signal is broadcasting. Whenever someone speaks into the radio you should see the words “voice” in the window, and hear voice.

DSD Command Prompt

If the word voice is constantly showing and a garbled sound is playing, you may be listening to an inverted DMR/MOTOTRBO signal. Try typing “dsd160 -xr” into the command prompt at step 5 instead. More DSD options for other digital signals can be found by looking at the DSD help screen by typing in “dsd160 -h”.

To get good decodes (for most soundcards), the volume settings in SDRSharp and Windows should be played with until “inlvl” reads at approximately 30% for best performance. Note that all soundcards are different, and DSD may get better performance at a different percentage on your computer.

To stop DSD, simply press “ctrl + c” at the command prompt while it is running.

Some Tips

  • If you don’t know what P25, MOTOTRBO, ProVoice or any digital voice signals sound like, this page has some more example audio files.
  • You can simply manually scan through various signals, and see if DSD starts scrolling text to see if a signal is supported. DSD will start attempting to decode immediately. Note however that DSD will also scroll text on trunking channels, but will not be able to decode them. See the next section for information on decoding trunking channels.
  • A strong signal is required for DSD to decode audio well. Ensure you are using a good antenna and have set the RTL-SDR gain correctly.
  • DSD will listen to the default windows sound recording device. Make sure virtual audio cable or VB-cable is set as the default device. No text will be scrolling within DSD if the wrong audio device is used.
  • Stereo mix can be used, but you will be hearing both the digital signal as well as the decoded voice at the same time. Also, the decoded voice audio will be pumped back into DSD causing a detrimental feedback loop.
  • DSD is software in development and may not perform as well as a commercial digital radio.

More Advanced Digital Radio Scanning

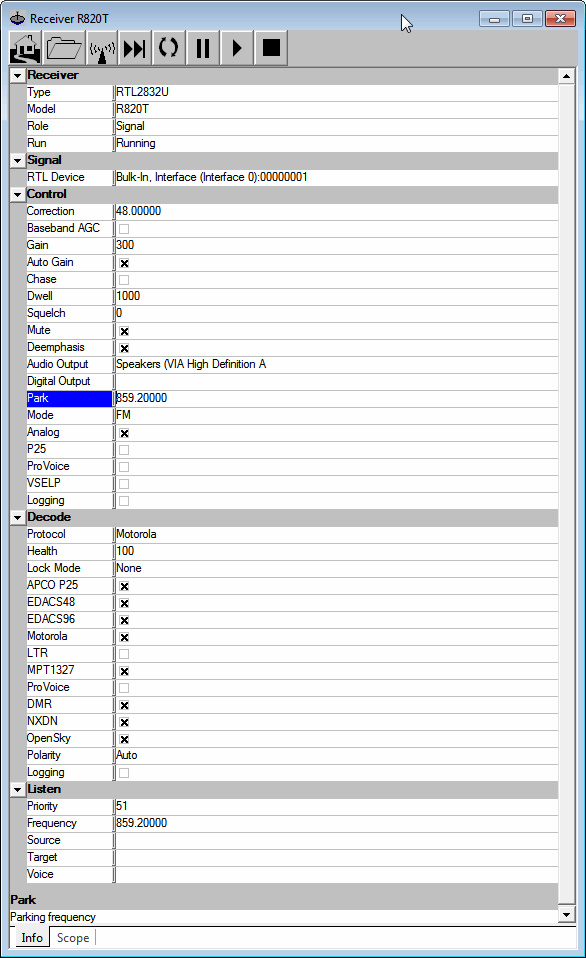
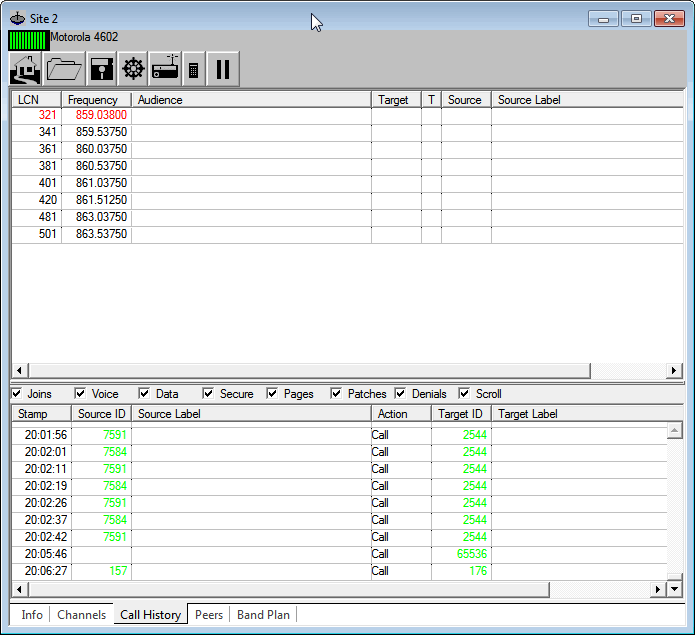
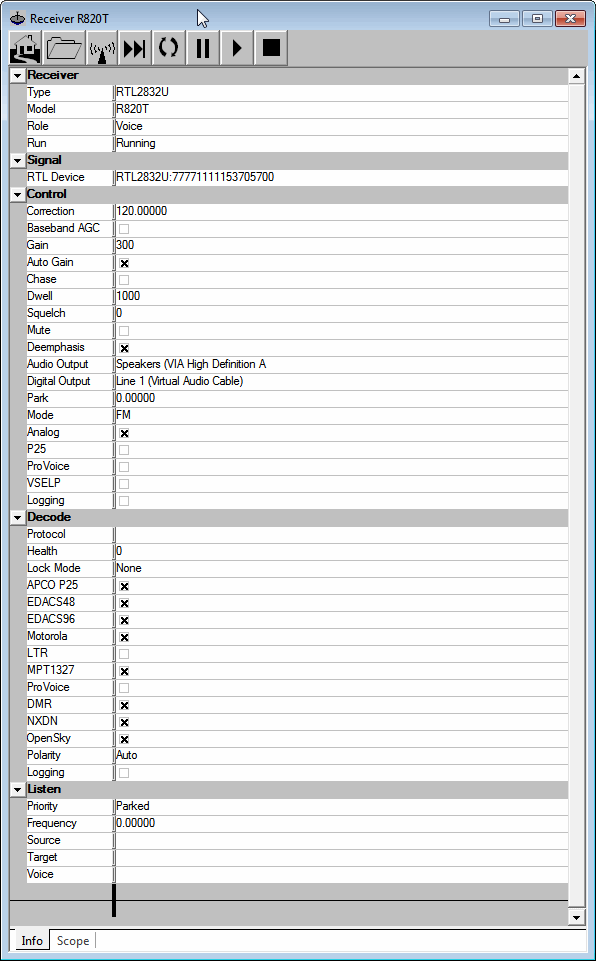
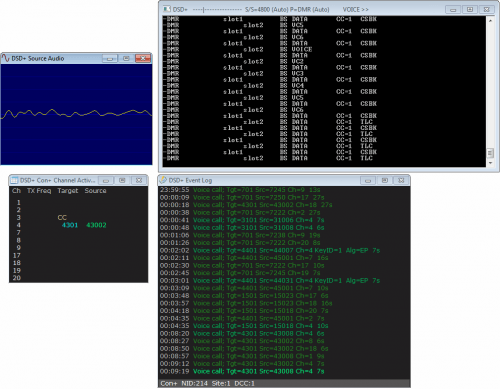
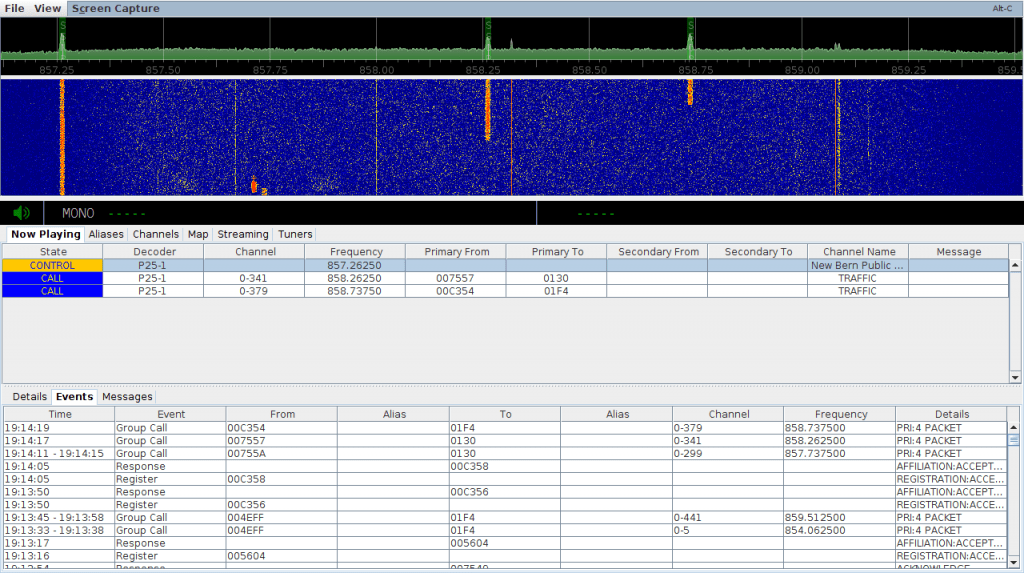
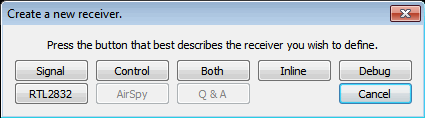
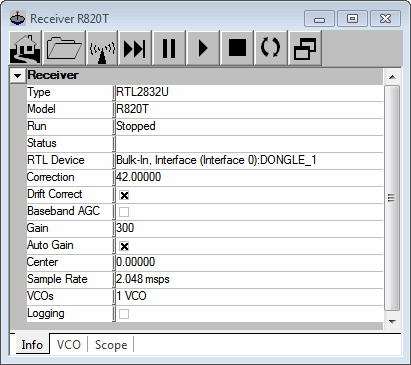
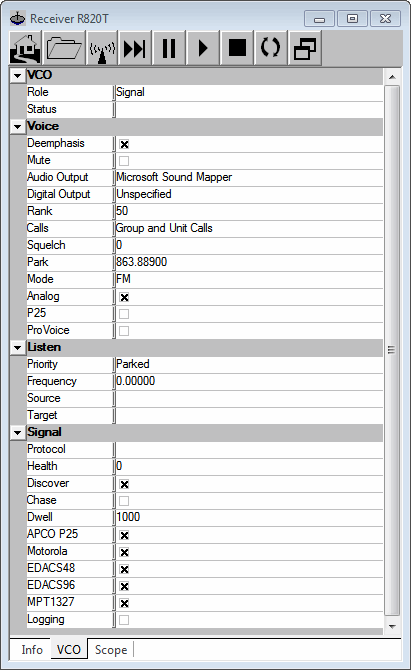
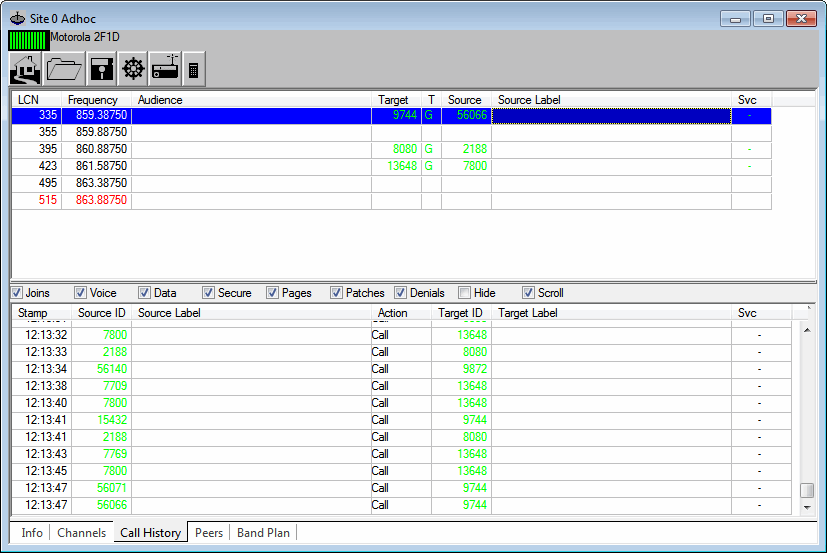
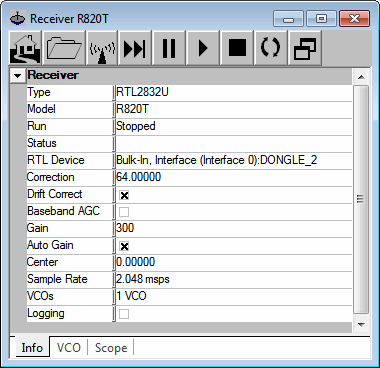
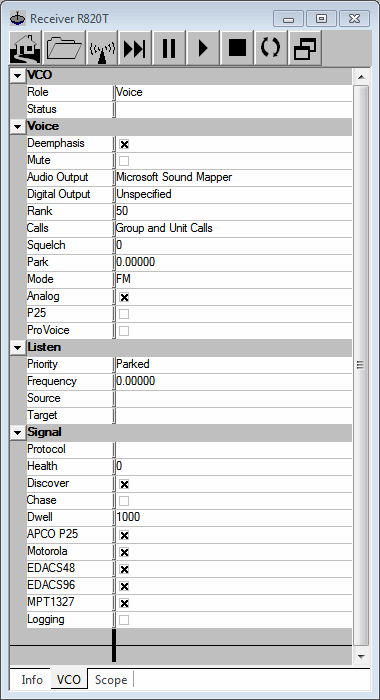
As digital voice uses a trunking system, unitrunker can be run along with DSD to follow conversations across channels. Suprisingly, only one RTL-SDR dongle is required. This allows RTL-SDR to work as a proper radio scanner which can follow conversations across frequencies.

A good write up of how this can be done is presented here, with example video shown by YouTube user jcims.

YouTube Video


If you enjoyed this tutorial you may like our ebook available on Amazon.

The Hobbyist’s Guide to the RTL-SDR: Really Cheap Software Defined radio.

The post RTL-SDR Tutorial: Decoding Digital Voice (P25) with DSD appeared first on rtl-sdr.com.


New DSD Block Available for GNU Radio

$
0
0

The popular digital speech decoder (DSD) software has now been wrapped into a GNU Radio Companion block. Previously, DSD required use of virtual audio cables to get decoding to work with GNU Radio, but now the signal audio can be passed directly into this block.

Luke Berndt from the HackRF-dev forums has posted his work to make the functionality of DSD available to GNU Radio users in the form of a GRC block. “I have been playing around a bit and found an easy way to receive and playback digital LMR. More and more of the radio systems are going from narrow band FM to Digital. This makes it tough to listen to them on GQRX. DSD is a great program which can decoded the audio you get when you tune in a system in GQRX, but you either have to run it on another machine with a audio cable in between or figure out how to do a virtual audio cable on your machine.

Luckily, someone wrapped the DSD libraries so they can be accessed as GRC blocks. I have put together a GRC file and a Python program that make it a little easier to use the block.

If you have a chance, give them a try and let me know if they work. There is a good chance I have messed up the values in the filters or else where, but I have gotten clean audio out of it.”

Download the files from GitHub.

DSD is a Linux and Windows software program capable of decoding popular digital speech codecs such as APCO P25 and MOTOTRBO/DMR.

Via DangerousPrototypes

The post New DSD Block Available for GNU Radio appeared first on rtl-sdr.com.

Improved Digital Voice P25 Decoding with DSD+

$
0
0

Over on Reddit we’ve seen mention of an upgraded Digital Speech Decoder (DSD) program, named DSD+. The original DSD is a program that can be used in conjuction with a SDR receiving program such as SDR#, and an audio piping program like VBCable to decode digital speech, such as P25 and DMR/MOTOTRBO.

DSD+ claims to have improved decoding and audio quality capabilities. An audio sample from a weak P25 sample can be found here for DSD+, and for comparison here for the old DSD.

DSD+ can be downloaded from this megaupload link.

To run DSD+. you will need to place an MP3 encoder file lame_enc.dll into the same folder as the dsd.exe executable. This file is not included with DSD+ due to licencing. For Windows, lame_enc.dll can be downloaded from http://lame1.buanzo.com.ar/#lamewindl (Mega Mirror). Download the ZIP option, and then copy the dll file into the same folder as DSD+.

If you don’t know how to use DSD, see our tutorial on using DSD here, and if desired simply use DSD+ instead of the original DSD. (Note cygwin is not required for DSD+)

DSD+ Output
DSD+ Output

EDIT: There is now a new version of DSD+ see http://www.rtl-sdr.com/dsd-version-1-5-released/.

The post Improved Digital Voice P25 Decoding with DSD+ appeared first on rtl-sdr.com.

RTL-SDR DSD Call Log Recorder

$
0
0

Programmer Tyler Watt has been working on software that automatically logs each call from an RTL-SDR running DSD (Digital Speech Decoder) and then stores it in a time stamped database as an mp3 file. There is also a web front end for the database which allows public users to search and play recorded calls.

Recently Tyler updated his code by rewriting it in PHP and making it multiplatform.

The old version of his web front end in action for his local P25 calls can be viewed here, and the newer one can be found here.

The post RTL-SDR DSD Call Log Recorder appeared first on rtl-sdr.com.

RTL-SDR Tutorial: Following Trunked Radio with Unitrunker

$
0
0

The popular trunking decoding software Unitrunker now supports the RTL2832U R820T RTL-SDR directly in its new version. This means that extra SDR receiver software like SDR# is no longer required to use Unitrunker.

You can download the latest version of Unitrunker here.

In a normal radio system, one company (or talkgroup) might use a single frequency for radio communications. However, this is very inefficient as the frequency may not be in use for the majority of the time. In a trunked radio system, a small set number of frequencies are shared between a large number of talkgroups. Each radio receives a special computer controlled control channel. The control channel determines a vacant frequency that a particular talkgroup should use. This helps to make radio frequency allocations more efficient.

Because a talkgroup might switch between various frequencies often, it can make listening to a conversation difficult for radio scanners. Unitrunker can be used to decode the control channel and follow a voice conversation as it hops across various frequencies. With two RTL-SDR dongles you can set up a trunking receiver station with just Unitrunker. What follows below is a tutorial on how to set this up.

Unitrunker Voice Trunking Following Tutorial

To set up a trunking station we will assume that you have been through the Quickstart guide and thus have a working RTL-SDR setup. In addition you will need

  1. 2x R820T RTL2832U RTL-SDR dongles. See the Buy RTL-SDR dongles page if you don’t already have two. You will need one dongle to receive the control channel and one dongle to receive the voice channel. Only the R820T appears to be supported at the moment.
  2. The Unitrunker software (Choose the latest version from http://www.unitrunker.com/download/)
  3. One antenna that splits into two connections for the two dongles, or two antennas that can receive the trunking frequencies you are interested in.

Now follow these steps to set up Unitrunker with the RTL2832U.

Setting up the Signal (Control Channel) Receiver

  1. First determine a trunking control channel that you are interested in monitoring. You can use SDR# or a similar program to search for these first. They will be signals that are continuously transmitting with no breaks. Here are some examples of some common trunking modes. The are commonly found in the 400 and 800 MHz bands.
APCO P25
APCO P25 Trunking Channel
EDACS96
EDACS96 Trunking Channel
Motorola 2F1D
Motoroal 2F1D Trunking Channel
MPT 1327
MPT1327 Waterfall Image 
  1. Plug in both dongles and then open Unitrunker.
  2. Press the ‘Add new receiver’ button add_new_rcvr_button, and then on the bar that pops up click on the RTL2832 button.

    rtl2832_button
    Add Receiver

  3. In the new window that pops up change the Role to Signal.
  4. Under the Signal heading change the RTL Device to the stick that be used for the control channel.
  5. Type in your dongles frequency offset in PPM in Correction.
  6. Make sure that Mute is checked.
  7. Change the Park value to the frequency of the trunking channel that you wish to monitor.
  8. Under Decode check all the protocols that you are interested in listening to.
  9. Now at the top of this window press the Play button play_button_unitrunker. A new window should soon pop up and the value of the Protocol setting under the Decode heading should change to the trunking protocol detected.If the window does not pop up, either increase the Gain value or turn on the Auto Gain setting. If no window still pops up, set the Audio Output setting to your speakers and uncheck the mute button. Listen to see if the trunking channel is being correctly played through your speakers. If not, you may need to fine tune the frequency further by adjusting the Correction value.

    Signal Channel Settings
    Signal Channel Settings

  10. If the signal is strong enough, a new window should pop up. This new window shows the frequencies in use, and logs each call. If the frequencies are not showing, click the ‘Wizard’ button unitrunker_wizard_button whose icon looks like a calculator. Then choose the system used in your country. If unsure, try ‘Standard’ first.

    unitrunker_freq_window
    Frequency and Call Log Window

  11. Close the Receiver R820T options window for the signal channel and go back to the main Unitrunker Window.

Setting up the Voice Channel Receiver

Now that we have added the signal receiver and decoder we will add the voice receiver.

  1. Press the ‘Add new receiver’ button add_new_rcvr_button once again, and then on the bar that pops up click on the RTL2832 button.
  2. This time for the role choose ‘Voice’.
  3. For the RTL Device, choose your second RTL-SDR dongle.
  4. Set the gain and PPM offset appropriately.
  5. Choose the Audio Output as your speakers and make sure that Mute is not checked.
  6. Set the ‘Park’ frequency to zero.
  7. If desired, set the squelch to a value that is similar to what you might use in SDR#. The squelch will stop static from playing when there is no voice signal. You may wish to leave this at zero for now, and then tune it with trial and error later when you have everything going.

    Voice Channel Settings
    Voice Channel Settings

  8. Press the Play button play_button_unitrunker.

Enabling Unitrunker Following

Now we will make sure that Unitrunker is set to allow the voice receiver to follow calls from the signal channel.

  1. Go back to the main Unitrunker window and click on the Option tab at the bottom of the window.
  2. Make sure that Enable is checked under Listen. This will allow the voice channel to follow the trunking information from the control signal.

    unitrunker_options
    Unitrunker Global Options

At this point your trunking receiver should now be up and running!

Decoding Digital Voice (P25/DMR/Mototrbo/NXDN/ProVoice)

Decoding of unencrypted digital voice signals like P25/DMR/Mototrbo can be set up in the same way as the analog system shown above. However, instead of outputting audio to the speakers, audio should be output to a virtual audio pipe such as Virtual Audio Cable (VAC) or VB Cable using the Digital Output audio selection in Unitrunker. Then DSD+ should be used to listen to the audio pipe. Audio will only be piped to the Digital Output during a digital call.

Unitrunker Digital Audio Output

DSD+ is a program that is capable of decoding digital voice protocols such as P25, DMR/Mototrbo, NXDN and ProVoice. It is not capable of decoding encrypted digital voice channels. DSD+ is similar to DSD 1.6, but it has vastly improved decoding in terms of voice quality. You can find the download for DSD+ here. Be sure to follow the installation instructions on that page involving downloading the lame_enc.dll dll file.

To run DSD+ open a command prompt from Start->All Programs->Accessories->Command Prompt, and navigate to the folder where DSD+ is located. For those who are not familiar with the command prompt, use the ‘cd’ command to change directories within command prompt. For example, if your DSD+ folder is located in c:\Radio\DSD+, you would type in command prompt ‘cd c:\Radio\DSD+’.

Then in command prompt type ‘dsd -i1M’, where the number after the -i is the number of your audio pipe. If your audio pipe is set as your default sound device in the Windows audio recording properties it will be device 1, otherwise it may be device 2 or higher. You can use ‘dsd -h’ to see more options for DSD+.

Make sure that the Deemphasis option in Unitrunker is turned OFF for the voice receiver to make it work with DSD+.

Tips:

  • For digital voice you may need to play with the Windows volume settings of your audio pipe to improve decoding.
  • You will require a decent antenna that is capable of receiving the trunking frequencies you are interested in.
  • Unitrunker can be coupled with a radioreference.com account to get trunk group names.

If you enjoyed this tutorial you may like our ebook available on Amazon.

The Hobbyist’s Guide to the RTL-SDR: Really Cheap Software Defined radio.

The post RTL-SDR Tutorial: Following Trunked Radio with Unitrunker appeared first on rtl-sdr.com.

DSD+ Version 1.5 Released

$
0
0

Version 1.5 of Digital Speech Decoder Plus (DSD+) has been released. DSD+ is a popular Windows software tool used for decoding digital speech such as P25 with the RTL-SDR. The latest version comes with a simple GUI interface that has an event log that shows call target and source ID history and an audio waveform plot which can help determine if DSD+ is receiving audio correctly. This version of DSD+ has the ability to decode the following protocols.

  • D-STAR
  • NXDN4800
  • NXDN9600
  • DMR/MotoTRBO
  • P25 Phase 1
  • X2-TDMA
  • ProVoice

In addition to the above, the new version comes with an LRRP decoder and display program which should allow you to see on a map the GPS location of broadcasting radios.

DSD+ V1.51 can be downloaded from this link. The forum thread on RadioReference where the developer releases and discusses the DSD+ software can be found here.

This version of DSD+ comes with all the files needed to make it run already. To use DSD+ V1.5 simply extract the zip file into a folder and double click on DSDPlus.EXE. DSD+ will listen to your default audio device that is set in the Windows sound recording properties. Simply tune to a digital voice signal in SDR# or any other SDR receiver and set the output audio settings accordingly. To start the LRRP display program simply open LRRP.exe.

DSDPlusv1p5
DSD+ V1.5 GUI
DSD+ V1.5 LRRP GPS Display

The post DSD+ Version 1.5 Released appeared first on rtl-sdr.com.

Monitoring a Trunked P25 LSM Simulcast System with OP25 and an RTL SDR

$
0
0

Over on YouTube user jdlucas78 has uploaded a video showing a P25 LSM modulated digital voice signal being decoded by the Osmocom OP25 software for Linux. Although DSD and DSD+ can decode P25 voice, it seems that the Osmocom OP25 software is better at decoding P25 signals as it implements better error correction algorithms.

Over on the RadioReference forums there is a thread discussing the use of the OP25 decoding software which can be found here. There is a post in the thread that shows an easy Linux install procedure for the OP25 software.

YouTube Video

YouTube Video

The post Monitoring a Trunked P25 LSM Simulcast System with OP25 and an RTL SDR appeared first on rtl-sdr.com.

New Version of Digital Speech Decoder DSD+ 1.071 Released

$
0
0

The latest version of Digital Speech Decoder+ (DSD+) has just been released, bringing it up to version 1.071. There appears to be no changelog, so we are unsure as to what is new, but one obvious change is that they now include a new program called FMP which is a simple NFM demodulator, similar to rtl_fm, although it does have a GUI with point and click tuning. FMP can be used as a replacement for SDR# or similar software, and is especially useful to use on low end devices such as netbooks.

An active discussion on the latest release of this software can be found in this thread on the RadioReference.com forums.

The FMP NFM demodulator tuned to a MotoTRBO signal.

DSD+ is a Windows program which can be used to decode and listen to digital voice protocols such as D-STAR, NXDN4800, NXDN9600, DMR/MotoTRBO, P25 Phase 1, X2-TDMA and ProVoice with an RTL-SDR or other radio. On some DMR systems you may also be able to use the included LRRP software, which allows you to view the GPS locations of broadcasting radios. The last major release was version 1.05.

DSD+ GUI
DSD+ GUI

The DSD+ team are now also offering a “fast lane” early access program, which for a small donation will allow you to have early access to new and upcoming DSD+ features. They aim to release a new update to donators every 7 to 30 days, while stable public releases will continue to be released every 4 to 6 months. The donation costs $10 for one year of early access, and $25 for lifetime updates. Some features they are currently working on include:

  • Better tablet support
  • IDAS/NEXEDGE/Cap+/Con+/TIII trunk voice following
  • Per-call audio recordings
  • Other needed DSD+ upgrades
  • FMP upgrades
    • Squelch
    • Drift tracking
    • Selectable sampling rates
    • Adjustable windows sizes
    • TCP client/server mode (eliminates VAC / VB-C)
    • Multiple VFOs
    • Airspy support

The post New Version of Digital Speech Decoder DSD+ 1.071 Released appeared first on rtl-sdr.com.


P25 Decoding: OP25 + RTL-SDR vs a Uniden BCD996T

$
0
0

APCO P25 is a digital voice signal and is commonly used like public safety departments such as police and fire. With an RTL-SDR and the open source Linux based OP25 decoder these signals can be decoded, assuming they are unencrypted. Software like DSD+ can also be used, but OP25 can supposedly decode more systems. Before the RTL-SDR, hardware scanners like the $~360 USD Uniden BCD996T digital scanner radio were typically used. 

Over on YouTube user Rob Fissel has uploaded a video showing a comparison between an RTL-SDR using the OP25 decoder and a Uniden BCD996T. Both radios are used to decode a weak P25 Phase 1 LSM signal. He uses a Scantenna antenna with an antenna splitter to run both radios at the same time. His results show that even though the constellation is poor, OP25 does a good job at decoding the signal and producing voice, whereas the BCD996T doesn’t even manage to hear the control channel.

https://www.youtube.com/watch?v=NPWlwpr55pE

The post P25 Decoding: OP25 + RTL-SDR vs a Uniden BCD996T appeared first on rtl-sdr.com.

Installing and Using SDRTrunk on Linux for Live Trunk Tracking with an RTL-SDR

$
0
0

SDRTrunk is a cross platform Java based piece of software that can be used for following trunked radio conversations. In addition to trunk tracking it also has a built in P25 Phase 1 decoder. Compared to Unitrunker SDRTrunk is an all-in-one package, and currently it supports most trunking system control channels, but unlike Unitrunker it still misses out on some systems EDACS and DMR.

Over on his YouTube channel AVT Marketing has uploaded an excellent 6-part video series that shows how to install SDRTrunk and the Java runtime environment on Ubuntu Linux. The sections covered include, installing Java, setting the Java environment variables, installing other SDRTrunk prerequisites such as Apache Ant and the JMBE audio codec for decoding P25, and finally actually using and setting up SDRTrunk. Like all of AVT’s other videos, this is an excellent tutorial that takes you through the entire process from the very beginning so is useful for beginners as well.

If you’re new to trunking: Trunking systems are typically used with handheld radio systems (e.g. those that police, security guards, workmen etc carry around). The basic idea is that each radio constantly listens to a digital control channel which tells it what frequency to switch to if a call is being made. This allows the frequency spectrum to be shared, instead of designating one fixed frequency per user which would be very inefficient. But this system makes it difficult for scanner radios to listen in to, because the voice frequency could change at any time. Therefore software like Unitrunker and SDRTrunk which can decode the control channel is required. In addition many new systems use digital audio like P25 or DMR which requires digital decoders like SDRTrunk or DSDPlus.

SDRTrunk Setup and Use Tutorial

$
0
0

Over on his blog John Hagensieker has uploaded a tutorial that shows how to set up SDRTrunk with RTL-SDR dongles. SDRTrunk is an application that allows you to follow trunked radio conversations, and decode some digital voice protocols such as P25 Phase 1. It is similar to Unitrunker and DSDPlus combined into one program. It is also Java based so it is cross platform and so can be used on Linux and MacOS systems as well.

John’s tutorial contains many useful screenshots, so it should be great for a beginner. He starts from the beginning, with finding trunking frequencies over on radioreference.com, then goes on to the installation and use on Linux. He also later explains how the Airspy can be used instead of multiple RTL-SDR to cover 10 MHz of bandwidth so that multiple systems can be monitored.

SDRTrunk Running and decoding a P25 Phase 1 System

RTL-SDR DSD Call Log Recorder

$
0
0

Programmer Tyler Watt has been working on software that automatically logs each call from an RTL-SDR running DSD (Digital Speech Decoder) and then stores it in a time stamped database as an mp3 file. There is also a web front end for the database which allows public users to search and play recorded calls.

Recently Tyler updated his code by rewriting it in PHP and making it multiplatform.

The old version of his web front end in action for his local P25 calls can be viewed here, and the newer one can be found here.

RTL-SDR Tutorial: Following Trunked Radio with Unitrunker

$
0
0

The popular trunking decoding software Unitrunker now supports the RTL2832U R820T RTL-SDR directly in its new version. This means that extra SDR receiver software like SDR# is no longer required to use Unitrunker.

You can download the latest version of Unitrunker here.

In a normal radio system, one company (or talkgroup) might use a single frequency for radio communications. However, this is very inefficient as the frequency may not be in use for the majority of the time. In a trunked radio system, a small set number of frequencies are shared between a large number of talkgroups. Each radio receives a special computer controlled control channel. The control channel determines a vacant frequency that a particular talkgroup should use. This helps to make radio frequency allocations more efficient.

Because a talkgroup might switch between various frequencies often, it can make listening to a conversation difficult for radio scanners. Unitrunker can be used to decode the control channel and follow a voice conversation as it hops across various frequencies. With two RTL-SDR dongles you can set up a trunking receiver station with just Unitrunker. What follows below is a tutorial on how to set this up.

Unitrunker Voice Trunking Following Tutorial

To set up a trunking station we will assume that you have been through the Quickstart guide and thus have a working RTL-SDR setup. In addition you will need

  1. 2x R820T RTL2832U RTL-SDR dongles. See the Buy RTL-SDR dongles page if you don’t already have two. You will need one dongle to receive the control channel and one dongle to receive the voice channel. Only the R820T appears to be supported at the moment. You can also use other supported and more advanced SDR’s such as the Airspy.
  2. The Unitrunker software (Choose the latest version from http://www.unitrunker.com/download/)
  3. One antenna that splits into two connections for the two dongles, or two antennas that can receive the trunking frequencies you are interested in.

Now follow these steps to set up Unitrunker with the RTL2832U.

Setting up the Signal (Control Channel) Receiver

  1. First determine a trunking control channel that you are interested in monitoring. You can use SDR# or a similar program to search for these first. They will be signals that are continuously transmitting with no breaks. Here are some examples of some common trunking modes. The are commonly found in the 400 and 800 MHz bands.

APCO P25

APCO P25 Trunking Channel

EDACS96
EDACS96 Trunking Channel

Motorola 2F1D
Motoroal 2F1D Trunking Channel

MPT 1327

MPT1327 Waterfall Image


  1. Plug in both dongles and then open Unitrunker.
  2. Press the ‘Add new receiver’ button add_new_rcvr_button, and then on the bar that pops up click on the RTL2832 button.
    Add new receiver
    Add new receiver
  3. In the new window that pops up choose your first RTL-SDR under “RTL Device”.
  4. Enter that units PPM correction value under “Correction”. Note: Make sure that you are entering the correct value for the correct dongle. If you are unsure which dongle is which then you may like to try labeling the dongles with rtl_eeprom first.
  5. We also recommend enabling “Baseband AGC”, turning on “Auto Gain”, enabling “Drift Correct”, setting the sample rate to 2.048 msps and settings “VCOs” to 1 VCO. If you have an older and slower PC you may wish to set the sample rate lower.
    Set sample rate, gains and PPM offset
    Set sample rate, gains and PPM offset
  6. Click on the first VCO tab at the bottom of the window.
  7. Change the “Role” to “Signal”.
  8. Change the “Park” value to the frequency in MHz of the trunking control channel that you want to monitor. For example if you wish to monitor a control frequency at 862.839700 MHz, then enter 862.839700 into the box.
  9. Under the “Signal” heading ensure that all the control channel protocols that you want to possibly decode are checked and that “Discover” is also checked.
    Set the role to Signal, set the park frequency and choose the protocols
    Set the role to Signal, set the park frequency and choose the protocols
  10. Now at the top of this window press the Play button play_button_unitrunker .
  11. If everything is tuned correctly a new Site window should soon pop up and you should audibly hear the control channel sound coming through your speakers. In the VCO tab you should also see under the “Signal” heading the protocol dectected and it’s “Health”, which measures the quality of reception.
    1. If every thing worked correctly, then go back to the first VCO tab, and ensure that “Mute” is checked. This will mute the control channel audio.
    2. If no new site window popped up and/or you don’t hear the control channel then go back to the first VCO tab and ensure the “Audio Outout” is set to your speakers, and that the park frequency is set correctly. Also go back to the Info tab and check that the PPM Correction is set correctly. You may also need to adjust the gain settings – try manual gain by unchecking both “Baseband AGC” and “Auto Gain” and using trial and error to choose a gain value between (0 – 500). Monitor the “Health” reading of the signal under the “Signal” heading in the VCO tab. If it is below 100 it may indicate reception problems which will need to be solved by tuning the signal correctly, adjusting the gain, or using a better antenna.
  12. The Site window shows the frequencies in use, and logs each call. If the frequencies are not showing, click the ‘Wizard’ button unitrunker_wizard_button whose icon looks like a calculator. Then choose the system used in your country. If unsure, try ‘Standard’ first as this is the most commonly used.
    The new site window
    The new site window
  13. (Optional) If you have a RadioReference.com account, you can click on the gear icon and enter your RadioReference account credentials. This will download information provided by RadioReference.com, including site information and some talk group labels.
  14. Close the Receiver R820T options window for the signal channel, move the new site window out of the way (don’t close it) and go back to the main Unitrunker Window.

Setting up the Voice Channel Receiver

Now that we have added the signal receiver and decoder we will add the voice receiver.

  1. Press the ‘Add new receiver’ button add_new_rcvr_button once again, and then on the bar that pops up click on the RTL2832 button.
  2. Set the “RTL Device” to the second RTL-SDR dongle you have plugged in.
  3. As in the previous steps enter that units PPM correction value under “Correction”, enable “Drift Correct”, enable “Baseband AGC”, enable “Auto Gain” and set the sample rate to 2.048 msps.
    Create the second receiver
    Create the second receiver
  4. Click on the first VCO tab at the bottom of the window.
  5. Change the “Role” to “Voice”.
  6. Ensure that “Mute” is unchecked, and set the “Audio Output” to your speakers.
    Set up the voice receiver
    Set up the voice receiver
  7. Press the Play button play_button_unitrunker.
  8. You should now be listening to trunked conversations! If you hear a lot of static in between calls, you may wish to set the “Squelch” option. In the voice receiver options, under the VCO tab adjust the “Squelch” value, until the static disappears, but voice still comes through.

Monitoring Multiple Control Channels with Multiple VCOs

More recent versions of Unitrunker have the option to use multiple VCO’s. Basically this allows you to tune and monitor to multiple control channels with a single dongle, as long as they all fit within the dongles bandwidth. Unitrunker allows the RTL-SDR bandwidth to be set up to 2.56 MHz. To enable monitoring of multiple VCO’s

  1. Open the options for your Signal receiver and go to the info tab.
  2. Change the “VCOs” setting to 2 VCOs, or however many you want.
  3. Go to the second VCO tab.
  4. Set the “Role” to “Signal”.
  5. Set the “Park” frequency to the second control channel you wish to monitor.
  6. Do this for all VCOs if you have selected more than two.

Monitoring with only One Dongle

If you only have one RTL-SDR dongle it is still possible to monitor trunked conversations using the multiple VCO’s feature of Unitrunker. This will work well as long as the voice channels are within the same bandwidth as the control channel. For the RTL-SDR this should be within about 2.56 MHz of bandwidth.

  1. Press the ‘Add new receiver’ button and then on the bar that pops up click on the RTL2832 button.
  2. Under “RTL Device” select your dongle.
  3. Set the PPM offset correction, enable “Drift Correction”, enable “Baseband AGC”, enable “Auto Gain” and set the sample rate to 2.560 msps, and set the number of VCOs to 2 VCOs.
  4. Go to the first VCO tab, and set the “Role” to Signal.
  5. Set the “Park” frequency to the frequency of the control channel.
  6. Ensure that “Mute” is checked.
  7. Go to the second VCO tab, and set the “Role” to voice.
  8. Press the Play button . A new site window should pop up.
  9. If the frequencies are not showing, click the ‘Wizard’ button  whose icon looks like a calculator. Then choose the system used in your country. If unsure, try ‘Standard’ first as this is the most commonly used.
  10. You should now be listening to trunked conversations!
  11. Once you have the system running to improve performance we recommend disabling “Auto Gain” and instead setting the gain manally using the “Gain” entry under the “Info” tab in both the Signal and Control RTL-SDR options. The gain can be set from 0 to 500.

Decoding Digital Voice (P25/DMR/Mototrbo/NXDN/ProVoice)

Decoding of unencrypted digital voice signals like P25/DMR/Mototrbo can be set up in the same way as the analog system shown above. However, instead of outputting audio to the speakers, audio should be output to a virtual audio pipe such as Virtual Audio Cable (VAC) or VB Cable using the Digital Output audio selection in Unitrunker. Then DSD+ should be used to listen to the audio pipe. Audio will only be piped to the Digital Output during a digital call.

Unitrunker Digital Audio Output

DSD+ is a program that is capable of decoding digital voice protocols such as P25, DMR/Mototrbo, NXDN and ProVoice. It is not capable of decoding encrypted digital voice channels. DSD+ is similar to DSD 1.6, but it has vastly improved decoding in terms of voice quality. You can find the latest download for DSD+ at www.dsdplus.com. To install DSDPlua download both the latest DSDPlus and DSDPlus DLL zip files. Then extract both zip files into the same folder.

To run DSD+ simply double click on DSDPlus.exe. This will open up several windows. DSD+ will listen to the default sound device in the Windows audio recording properties.

Make sure that the Deemphasis option in Unitrunker is turned OFF for the voice receiver to make it work with DSD+.

Tips:

  • For digital voice you may need to play with the Windows volume settings of your audio pipe to improve decoding.
  • You will require a decent antenna that is capable of receiving the trunking frequencies you are interested in.
  • Unitrunker can be coupled with a radioreference.com account to get trunk group names.

If you enjoyed this tutorial you may like our ebook available on Amazon.

The Hobbyist’s Guide to the RTL-SDR: Really Cheap Software Defined radio.

DSD+ Version 1.5 Released

$
0
0

Version 1.5 of Digital Speech Decoder Plus (DSD+) has been released. DSD+ is a popular Windows software tool used for decoding digital speech such as P25 with the RTL-SDR. The latest version comes with a simple GUI interface that has an event log that shows call target and source ID history and an audio waveform plot which can help determine if DSD+ is receiving audio correctly. This version of DSD+ has the ability to decode the following protocols.

  • D-STAR
  • NXDN4800
  • NXDN9600
  • DMR/MotoTRBO
  • P25 Phase 1
  • X2-TDMA
  • ProVoice

In addition to the above, the new version comes with an LRRP decoder and display program which should allow you to see on a map the GPS location of broadcasting radios.

DSD+ V1.51 can be downloaded from this link. The forum thread on RadioReference where the developer releases and discusses the DSD+ software can be found here.

This version of DSD+ comes with all the files needed to make it run already. To use DSD+ V1.5 simply extract the zip file into a folder and double click on DSDPlus.EXE. DSD+ will listen to your default audio device that is set in the Windows sound recording properties. Simply tune to a digital voice signal in SDR# or any other SDR receiver and set the output audio settings accordingly. To start the LRRP display program simply open LRRP.exe.

DSDPlusv1p5
DSD+ V1.5 GUI
DSD+ V1.5 LRRP GPS Display

Monitoring a Trunked P25 LSM Simulcast System with OP25 and an RTL SDR

$
0
0

Over on YouTube user jdlucas78 has uploaded a video showing a P25 LSM modulated digital voice signal being decoded by the Osmocom OP25 software for Linux. Although DSD and DSD+ can decode P25 voice, it seems that the Osmocom OP25 software is better at decoding P25 signals as it implements better error correction algorithms.

Over on the RadioReference forums there is a thread discussing the use of the OP25 decoding software which can be found here. There is a post in the thread that shows an easy Linux install procedure for the OP25 software.


New Version of Digital Speech Decoder DSD+ 1.071 Released

$
0
0

The latest version of Digital Speech Decoder+ (DSD+) has just been released, bringing it up to version 1.071. There appears to be no changelog, so we are unsure as to what is new, but one obvious change is that they now include a new program called FMP which is a simple NFM demodulator, similar to rtl_fm, although it does have a GUI with point and click tuning. FMP can be used as a replacement for SDR# or similar software, and is especially useful to use on low end devices such as netbooks.

An active discussion on the latest release of this software can be found in this thread on the RadioReference.com forums.

The FMP NFM demodulator tuned to a MotoTRBO signal.

DSD+ is a Windows program which can be used to decode and listen to digital voice protocols such as D-STAR, NXDN4800, NXDN9600, DMR/MotoTRBO, P25 Phase 1, X2-TDMA and ProVoice with an RTL-SDR or other radio. On some DMR systems you may also be able to use the included LRRP software, which allows you to view the GPS locations of broadcasting radios. The last major release was version 1.05.

DSD+ GUI
DSD+ GUI

The DSD+ team are now also offering a “fast lane” early access program, which for a small donation will allow you to have early access to new and upcoming DSD+ features. They aim to release a new update to donators every 7 to 30 days, while stable public releases will continue to be released every 4 to 6 months. The donation costs $10 for one year of early access, and $25 for lifetime updates. Some features they are currently working on include:

  • Better tablet support
  • IDAS/NEXEDGE/Cap+/Con+/TIII trunk voice following
  • Per-call audio recordings
  • Other needed DSD+ upgrades
  • FMP upgrades
    • Squelch
    • Drift tracking
    • Selectable sampling rates
    • Adjustable windows sizes
    • TCP client/server mode (eliminates VAC / VB-C)
    • Multiple VFOs
    • Airspy support

P25 Decoding: OP25 + RTL-SDR vs a Uniden BCD996T

$
0
0

APCO P25 is a digital voice signal and is commonly used like public safety departments such as police and fire. With an RTL-SDR and the open source Linux based OP25 decoder these signals can be decoded, assuming they are unencrypted. Software like DSD+ can also be used, but OP25 can supposedly decode more systems. Before the RTL-SDR, hardware scanners like the $~360 USD Uniden BCD996T digital scanner radio were typically used. 

Over on YouTube user Rob Fissel has uploaded a video showing a comparison between an RTL-SDR using the OP25 decoder and a Uniden BCD996T. Both radios are used to decode a weak P25 Phase 1 LSM signal. He uses a Scantenna antenna with an antenna splitter to run both radios at the same time. His results show that even though the constellation is poor, OP25 does a good job at decoding the signal and producing voice, whereas the BCD996T doesn’t even manage to hear the control channel.

Installing and Using SDRTrunk on Linux for Live Trunk Tracking with an RTL-SDR

$
0
0

SDRTrunk is a cross platform Java based piece of software that can be used for following trunked radio conversations. In addition to trunk tracking it also has a built in P25 Phase 1 decoder. Compared to Unitrunker SDRTrunk is an all-in-one package, and currently it supports most trunking system control channels, but unlike Unitrunker it still misses out on some systems EDACS and DMR.

Over on his YouTube channel AVT Marketing has uploaded an excellent 6-part video series that shows how to install SDRTrunk and the Java runtime environment on Ubuntu Linux. The sections covered include, installing Java, setting the Java environment variables, installing other SDRTrunk prerequisites such as Apache Ant and the JMBE audio codec for decoding P25, and finally actually using and setting up SDRTrunk. Like all of AVT’s other videos, this is an excellent tutorial that takes you through the entire process from the very beginning so is useful for beginners as well.

If you’re new to trunking: Trunking systems are typically used with handheld radio systems (e.g. those that police, security guards, workmen etc carry around). The basic idea is that each radio constantly listens to a digital control channel which tells it what frequency to switch to if a call is being made. This allows the frequency spectrum to be shared, instead of designating one fixed frequency per user which would be very inefficient. But this system makes it difficult for scanner radios to listen in to, because the voice frequency could change at any time. Therefore software like Unitrunker and SDRTrunk which can decode the control channel is required. In addition many new systems use digital audio like P25 or DMR which requires digital decoders like SDRTrunk or DSDPlus.

SDRTrunk Setup and Use Tutorial

$
0
0

Over on his blog John Hagensieker has uploaded a tutorial that shows how to set up SDRTrunk with RTL-SDR dongles. SDRTrunk is an application that allows you to follow trunked radio conversations, and decode some digital voice protocols such as P25 Phase 1. It is similar to Unitrunker and DSDPlus combined into one program. It is also Java based so it is cross platform and so can be used on Linux and MacOS systems as well.

John’s tutorial contains many useful screenshots, so it should be great for a beginner. He starts from the beginning, with finding trunking frequencies over on radioreference.com, then goes on to the installation and use on Linux. He also later explains how the Airspy can be used instead of multiple RTL-SDR to cover 10 MHz of bandwidth so that multiple systems can be monitored.

SDRTrunk Running and decoding a P25 Phase 1 System

RTL-SDR Tutorial: Following Trunked Radio with Unitrunker

$
0
0

The popular trunking decoding software Unitrunker now supports the RTL2832U R820T RTL-SDR directly in its new version. This means that extra SDR receiver software like SDR# is no longer required to use Unitrunker.

You can download the latest version of Unitrunker here.

In a normal radio system, one company (or talkgroup) might use a single frequency for radio communications. However, this is very inefficient as the frequency may not be in use for the majority of the time. In a trunked radio system, a small set number of frequencies are shared between a large number of talkgroups. Each radio receives a special computer controlled control channel. The control channel determines a vacant frequency that a particular talkgroup should use. This helps to make radio frequency allocations more efficient.

Because a talkgroup might switch between various frequencies often, it can make listening to a conversation difficult for radio scanners. Unitrunker can be used to decode the control channel and follow a voice conversation as it hops across various frequencies. With two RTL-SDR dongles you can set up a trunking receiver station with just Unitrunker. What follows below is a tutorial on how to set this up.

Unitrunker Voice Trunking Following Tutorial

To set up a trunking station we will assume that you have been through the Quickstart guide and thus have a working RTL-SDR setup. In addition you will need

  1. 2x R820T RTL2832U RTL-SDR dongles. See the Buy RTL-SDR dongles page if you don't already have two. You will need one dongle to receive the control channel and one dongle to receive the voice channel. Only the R820T appears to be supported at the moment. You can also use other supported and more advanced SDR's such as the Airspy.
  2. The Unitrunker software (Choose the latest version from http://www.unitrunker.com/download/)
  3. One antenna that splits into two connections for the two dongles, or two antennas that can receive the trunking frequencies you are interested in.

Now follow these steps to set up Unitrunker with the RTL2832U.

Setting up the Signal (Control Channel) Receiver

  1. First determine a trunking control channel that you are interested in monitoring. You can use SDR# or a similar program to search for these first. They will be signals that are continuously transmitting with no breaks. Here are some examples of some common trunking modes. The are commonly found in the 400 and 800 MHz bands.

APCO P25
APCO P25 Trunking Channel

EDACS96
EDACS96 Trunking Channel

Motorola 2F1D
Motoroal 2F1D Trunking Channel

MPT 1327
MPT1327 Waterfall Image


  1. Plug in both dongles and then open Unitrunker.
  2. Press the 'Add new receiver' button add_new_rcvr_button, and then on the bar that pops up click on the RTL2832 button.
    Add new receiver
    Add new receiver
  3. In the new window that pops up choose your first RTL-SDR under “RTL Device”.
  4. Enter that units PPM correction value under “Correction”. Note: Make sure that you are entering the correct value for the correct dongle. If you are unsure which dongle is which then you may like to try labeling the dongles with rtl_eeprom first. Note 2: Dongles with TCXO's in them will not require any correction, so for those dongles this value can be left at zero.
  5. We also recommend enabling “Baseband AGC”, turning on “Auto Gain”, enabling “Drift Correct”, setting the sample rate to 2.048 msps and settings “VCOs” to 1 VCO. If you have an older and slower PC you may wish to set the sample rate lower.
    Set sample rate, gains and PPM offset
    Set sample rate, gains and PPM offset
  6. Click on the first VCO tab at the bottom of the window.
  7. Change the “Role” to “Signal”.
  8. Change the “Park” value to the frequency in MHz of the trunking control channel that you want to monitor. For example if you wish to monitor a control frequency at 862.839700 MHz, then enter 862.839700 into the box.
  9. Under the “Signal” heading ensure that all the control channel protocols that you want to possibly decode are checked and that “Discover” is also checked.
    Set the role to Signal, set the park frequency and choose the protocols
    Set the role to Signal, set the park frequency and choose the protocols
  10. Now at the top of this window press the Play button play_button_unitrunker .
  11. If everything is tuned correctly a new Site window should soon pop up and you should audibly hear the control channel sound coming through your speakers. In the VCO tab you should also see under the “Signal” heading the protocol dectected and it’s “Health”, which measures the quality of reception.
    1. If every thing worked correctly, then go back to the first VCO tab, and ensure that “Mute” is checked. This will mute the control channel audio.
    2. If no new site window popped up and/or you don’t hear the control channel then go back to the first VCO tab and ensure the “Audio Outout” is set to your speakers, and that the park frequency is set correctly. Also go back to the Info tab and check that the PPM Correction is set correctly. You may also need to adjust the gain settings - try manual gain by unchecking both “Baseband AGC” and “Auto Gain” and using trial and error to choose a gain value between (0 - 500). Monitor the “Health” reading of the signal under the “Signal” heading in the VCO tab. If it is below 100 it may indicate reception problems which will need to be solved by tuning the signal correctly, adjusting the gain, or using a better antenna.
  12. The Site window shows the frequencies in use, and logs each call. If the frequencies are not showing, click the ‘Wizard’ button unitrunker_wizard_button whose icon looks like a calculator. Then choose the system used in your country. If unsure, try ‘Standard’ first as this is the most commonly used.
    The new site window
    The new site window
  13. (Optional) If you have a RadioReference.com account, you can click on the gear icon and enter your RadioReference account credentials. This will download information provided by RadioReference.com, including site information and some talk group labels.
  14. Close the Receiver R820T options window for the signal channel, move the new site window out of the way (don’t close it) and go back to the main Unitrunker Window.

Setting up the Voice Channel Receiver

Now that we have added the signal receiver and decoder we will add the voice receiver.

  1. Press the 'Add new receiver' button add_new_rcvr_button once again, and then on the bar that pops up click on the RTL2832 button.
  2. Set the “RTL Device” to the second RTL-SDR dongle you have plugged in.
  3. As in the previous steps enter that units PPM correction value (only required for non-TCXO dongles) under “Correction”, enable “Drift Correct”, enable “Baseband AGC”, enable “Auto Gain” and set the sample rate to 2.048 msps.
    Create the second receiver
    Create the second receiver
  4. Click on the first VCO tab at the bottom of the window.
  5. Change the “Role” to “Voice”.
  6. Ensure that “Mute” is unchecked, and set the “Audio Output” to your speakers.
    Set up the voice receiver
    Set up the voice receiver
  7. Press the Play button play_button_unitrunker.
  8. You should now be listening to trunked conversations! If you hear a lot of static in between calls, you may wish to set the “Squelch” option. In the voice receiver options, under the VCO tab adjust the “Squelch” value, until the static disappears, but voice still comes through.

Monitoring Multiple Control Channels with Multiple VCOs

More recent versions of Unitrunker have the option to use multiple VCO’s. Basically this allows you to tune and monitor to multiple control channels with a single dongle, as long as they all fit within the dongles bandwidth. Unitrunker allows the RTL-SDR bandwidth to be set up to 2.56 MHz. To enable monitoring of multiple VCO’s

  1. Open the options for your Signal receiver and go to the info tab.
  2. Change the “VCOs” setting to 2 VCOs, or however many you want.
  3. Go to the second VCO tab.
  4. Set the “Role” to “Signal”.
  5. Set the “Park” frequency to the second control channel you wish to monitor.
  6. Do this for all VCOs if you have selected more than two.

Monitoring with only One Dongle

If you only have one RTL-SDR dongle it is still possible to monitor trunked conversations using the multiple VCO’s feature of Unitrunker. This will work well as long as the voice channels are within the same bandwidth as the control channel. For the RTL-SDR this should be within about 2.56 MHz of bandwidth.

  1. Press the ‘Add new receiver’ button and then on the bar that pops up click on the RTL2832 button.
  2. Under “RTL Device” select your dongle.
  3. Set the PPM offset correction, enable “Drift Correction”, enable “Baseband AGC”, enable “Auto Gain” and set the sample rate to 2.560 msps, and set the number of VCOs to 2 VCOs.
  4. Go to the first VCO tab, and set the “Role” to Signal.
  5. Set the “Park” frequency to the frequency of the control channel.
  6. Ensure that “Mute” is checked.
  7. Go to the second VCO tab, and set the “Role” to voice.
  8. Press the Play button . A new site window should pop up.
  9. If the frequencies are not showing, click the ‘Wizard’ button  whose icon looks like a calculator. Then choose the system used in your country. If unsure, try ‘Standard’ first as this is the most commonly used.
  10. You should now be listening to trunked conversations!
  11. Once you have the system running to improve performance we recommend disabling “Auto Gain” and instead setting the gain manally using the “Gain” entry under the “Info” tab in both the Signal and Control RTL-SDR options. The gain can be set from 0 to 500.

Decoding Digital Voice (P25/DMR/Mototrbo/NXDN/ProVoice)

Decoding of unencrypted digital voice signals like P25/DMR/Mototrbo can be set up in the same way as the analog system shown above. However, instead of outputting audio to the speakers, audio should be output to a virtual audio pipe such as Virtual Audio Cable (VAC) or VB Cable using the Digital Output audio selection in Unitrunker. Then DSD+ should be used to listen to the audio pipe. Audio will only be piped to the Digital Output during a digital call.

Unitrunker Digital Audio Output

DSD+ is a program that is capable of decoding digital voice protocols such as P25, DMR/Mototrbo, NXDN and ProVoice. It is not capable of decoding encrypted digital voice channels. DSD+ is similar to DSD 1.6, but it has vastly improved decoding in terms of voice quality. You can find the latest download for DSD+ at www.dsdplus.com. To install DSDPlua download both the latest DSDPlus and DSDPlus DLL zip files. Then extract both zip files into the same folder.

To run DSD+ simply double click on DSDPlus.exe. This will open up several windows. DSD+ will listen to the default sound device in the Windows audio recording properties.

Make sure that the Deemphasis option in Unitrunker is turned OFF for the voice receiver to make it work with DSD+.

Tips:

  • For digital voice you may need to play with the Windows volume settings of your audio pipe to improve decoding.
  • You will require a decent antenna that is capable of receiving the trunking frequencies you are interested in.
  • Unitrunker can be coupled with a radioreference.com account to get trunk group names.

If you enjoyed this tutorial you may like our ebook available on Amazon.

The Hobbyist's Guide to the RTL-SDR: Really Cheap Software Defined radio.

The post RTL-SDR Tutorial: Following Trunked Radio with Unitrunker appeared first on rtl-sdr.com.

Viewing all 54 articles
Browse latest View live